Deploy Everoute
Upload Everoute Installer
Prerequisites
Make sure that you have downloaded the Everoute Community Edition tar.gz installer on the SmartX official website.
Procedure
Log in to CloudTower, then go to the Network and Security page.
Click Settings. You should see the Settings dialog box.
Select Installation Package, then click Upload Installation Package. Note that only
tar.gzfiles are supported.
Deploy Everoute in SMTX OS Cluster
IP Settings for Everoute Controllers
Make sure that you have obtained the IPs of Everoute Controllers from the network administrator.
- The IP of each Everoute Controller and the IP of the management network can access each other.
- The IPs of Everoute Controllers can access each other.
Procedure
In the Settings page, click Deploy Everoute Service. You should see the Deploy Everoute Service page.
Configure basic information and set the global security policy. Click Next when the configuration is complete.
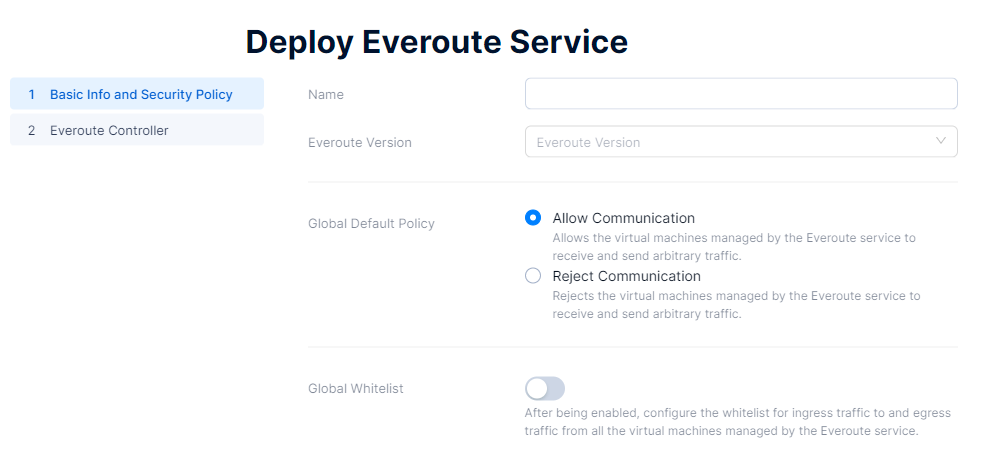
Configuration Item Operation Name Enter a name for the Everoute service. Everoute Version Select the Everoute version to be deployed. Global Default Policy Select Allow Communication if you want the virtual machine managed by the Everoute service to receive and send all traffic. Select Reject Communication if you want the virtual machine managed by the Everoute service not to receive or send any traffic. Global Whitelist Once enabled, configure the ingress and egress traffic whitelist. You can specify the whitelist by entering the IP address or using CIDR blocks, and also specify the protocols and corresponding ports allowed by Everoute. If Everoute has no protocol restrictions, select Any Protocol. Configure Everoute Controller.
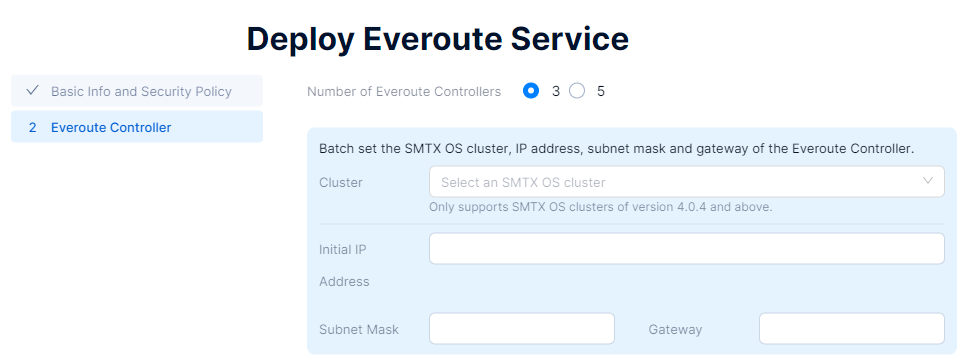
Select 3 as the number of Everoute Controllers to be deployed.
Set the cluster where Everoute Controllers are to be deployed. Then set the IP, subnet mask, and gateway.
- Cluster: Select the cluster where Everoute Controller is to be deployed.
- Initial IP Address: Optional. Once you enter the initial IP of Everoute Controller, the system will automatically assign IPs to all Everoute Controllers based on the initial IP.
- Subnet Mask: Enter the subnet mask of the Everoute Controller IP.
- Gateway: Enter the gateway of the Everoute Controller.
Set the virtual machine network and IP address for each Everoute Controller separately.
- Virtual Machine Network: Select the virtual machine network of Everoute Controller.
- IP Address: Enter the assigned IP of Everoute Controller according to the Everoute Controller IPs provided by the network administrator. If you have set the initial IP of Everoute Controller in bulk in the previous step and the IP shown is the IP address assigned by the system, you can modify this IP manually.
Click Deploy. The system will automatically complete the installation and deployment of Everoute.