In recent years, an increasing number of enterprises are adopting AI/ML and HPC in their production environment to accelerate IT modernization. As most of these applications have high demands for parallel computing, GPUs, which are made up of more specialized cores than CPUs, have been receiving attention more than ever.
However, in the market, GPU chips are scarce and come at a high price. To maximize GPU utilization, many enterprises choose to virtualize GPUs or use them in virtualization (including HCI). But how can we fully leverage GPU’s capabilities on virtualized IT infrastructure? And how can we provide stable, high-performance storage as well as compute resources for various GPU applications with an integrated IT infrastructure?
To help users address these challenges, SmartX has introduced GPU passthrough and vGPU features in the upgraded HCI software SMTX OS 5.1. Currently, SmartX HCI offers comprehensive GPU support for clusters based on native hypervisor ELF, and high-performance storage resource pools for various virtualization platforms, including VMware ESXi and Citrix XenServer. Enterprises can use SmartX HCI for various high-performance applications such as artificial intelligence, machine learning, image recognition and processing, VDI (such as 3D modeling and image rendering), and more.
SMTX OS 5.1 GPU Passthrough and vGPU Features
Key Capabilities
To meet the needs of diverse application scenarios, SMTX OS 5.1 supports two GPU use modes in virtualization:
- GPU Passthrough: This mode enables a VM to directly and exclusively use a physical GPU on the host.
- vGPU: In this mode, a single GPU device is sliced into multiple logical vGPUs, which are then allocated to VMs as virtual graphics cards. This enables multiple VMs to share the computing and graphics processing capabilities of one physical GPU.
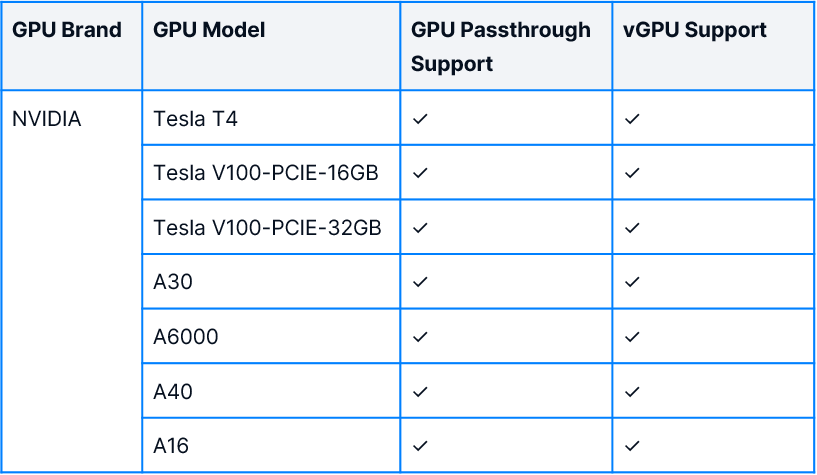
In both modes, each host can use multiple GPU devices with different models*, and each VM can be attached to multiple GPUs or vGPUs.
*Please refer to the Appendix for SMTX OS 5.1’s GPU compatibility list.
GPU Passthrough
GPU passthrough is a technique that allows a VM to have exclusive access to a physical GPU installed on the host. This GPU use mode is widely applicable and supports most GPU card models. It also offers excellent compatibility, as VMs recognize the GPU model accurately, allowing for the installation of official drivers and seamless utilization of all GPU features and functionalities. Additionally, since the Guest OS directly accesses the GPU device, it can fully leverage GPU and achieve performance close to bare metal.
However, it is important to note that in this use mode, a single GPU card cannot be used by multiple VMs at the same time. If multiple VMs require to use GPUs simultaneously, multiple GPU cards need to be installed and assigned to different VMs individually. Furthermore, VMs that enable GPU Passthrough do not support features such as high availability (HA), live migration, and segmented migration.
vGPU
vGPU allows multiple VMs to share the resources of a single GPU card, thereby improving resource utilization and lowering overall costs. Administrators can allocate different amounts of GPU resources according to users’ needs, such as 1/8 GPU, 1/4 GPU, etc., which is more flexible than that of GPU Passthrough.
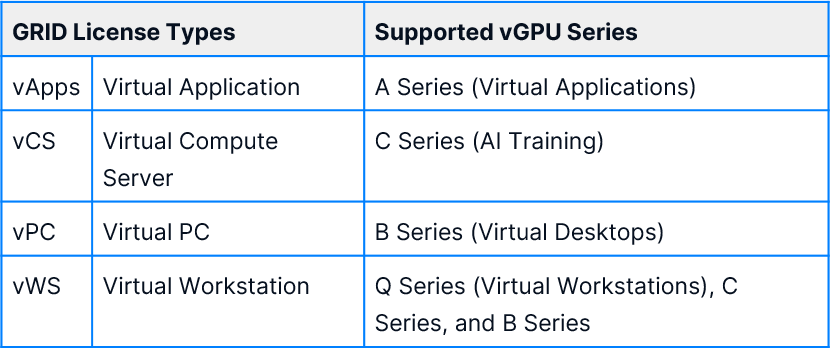
However, there are several ways to slice physical GPU, so different GPU models vary in slicing types and applicable workloads. Additionally, NVIDIA prescribes that vGPU should be matched with the NVIDIA GRID vGPU software license according to its series (see the table below). Make sure you have acquired the license before using vGPU.

Use Cases
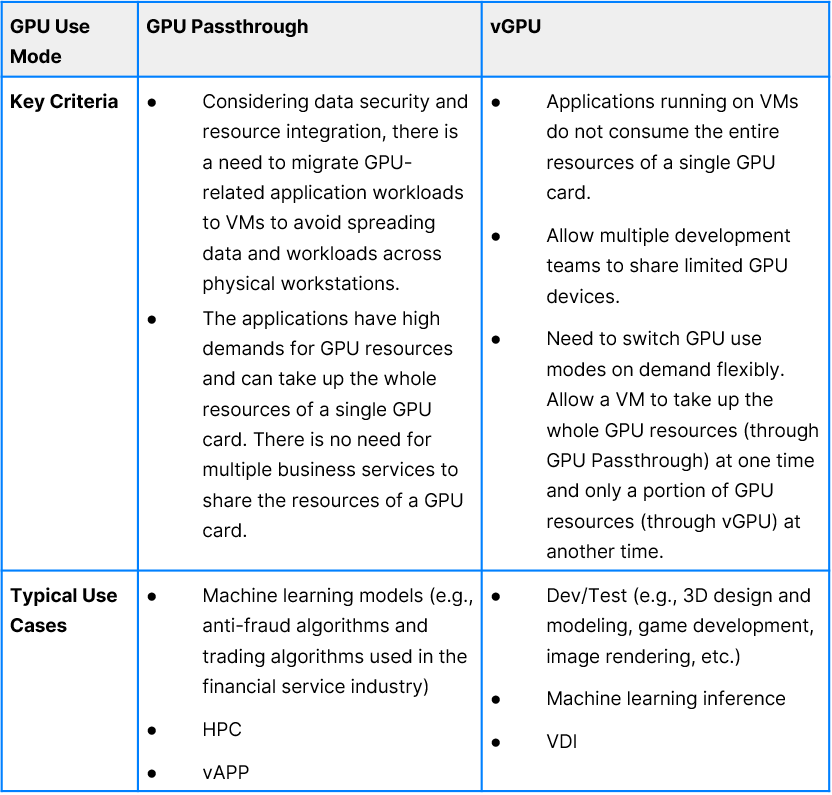
According to the two GPU use modes’ advantages and limitations, we have summarized their use cases in the table below.

Benefits and Values
- Rapid provisioning of development environments: With VM cloning and vGPU functionalities, users can quickly provision multiple sets of GPU development environments, enhancing development efficiency.
- Flexible resource allocation: Users can freely switch between GPU Passthrough and vGPU modes according to their needs and flexibly slice GPU resources to meet the requirements of different application scenarios. It also improves resource utilization and reduces costs.
- High-performance storage support: Application scenarios that rely on GPUs, such as 3D modeling and deep learning, often have high storage I/O requirements. For example, in deep learning training and inference scenarios, applications need to access many images, videos, audio, text, and structured data, involving various types of I/O. This requires high storage bandwidth and IOPS. Also, storage latency directly affects the performance of training algorithms. Integrated with independently developed distributed storage (ZBS), SmartX HCI can provide stable, high-performance, and low-latency storage services for GPU applications.
How to Use GPU Passthrough and vGPU on SmartX HCI
GPU Passthrough
Step 1. Configure the Host
First, ensure that the GPU devices on the host are compatible with SMTX OS. For detailed models, please refer to the Appendix at the end of the article. Then, log in to CloudTower, enable IOMMU support of the host, and reboot the host.
Step 2. Attach GPU Device to VM
Log in to CloudTower, and select GPU use mode as GPU Passthrough. Then, edit the designated VM, and attach the GPU device onto the VM.
Step 3. Configure the VM
Install the NVIDIA vGPU software graphics driver on the VM that has enabled GPU Passthrough and reboot it.
vGPU
Step 1. Configure the Host
First, ensure that the GPU devices on the host are compatible with SMTX OS. For detailed models, please refer to the Appendix at the end of the article. Next, install the vGPU driver (NVIDIA Virtual GPU Manager) on the SMTX OS host. Then, log in to CloudTower, enable IOMMU of the host, and reboot the host.
Step 2. Deploy License Server
Depending on supported business services, purchase the appropriate type and quantity of vGPU licenses from NVIDIA. Then, create a VM and configure the NVIDIA vGPU software license server on it. For deployment and configuration methods, please refer to the NVIDIA User Guide (link provided at the end of the article).
Step 3. Select GPU Reslicing Specification
GPU cards typically support multiple reslicing schemes. Log in to CloudTower and select the appropriate reslicing scheme, as shown in the diagram below.
Step 4. Attach vGPU Devices
Log in to CloudTower and edit the designated VM. Select vGPU and attach the vGPU to the VM, as shown in the diagram below.
Step 5. Configure the VM
Install the GPU driver (NVIDIA vGPU software graphics driver) on the VM and reboot it. For deployment and configuration methods, please refer to the NVIDIA User Guide.
In addition to GPU support, SMTX OS 5.1 further enhances virtualization and storage capabilities through various technologies such as DRS, USB cross-node access, PCI passthrough, large page memory allocation, storage concurrent access mechanism, and I/O path optimization. To learn more about the latest features and performance of SmartX HCI, please refer to Introducing SmartX HCI 5.1, Full Stack HCI for Both Virtualized and Containerized Apps in Production
Appendix: SMTX OS 5.1 GPU Compatibility List

Reference:
1. NVIDIA Virtual GPU Client Licensing User Guide (using version 15.3 as an example).
https://docs.nvidia.com/grid/15.0/grid-licensing-user-guide/index.html#abstract
