One of the most prevalent problems encountered in storage systems is disk failure. Since all hard drives are consumable and subject to wear and tear, continuous usage can lead to a decline in disk performance. Hence, it is crucial to carry out frequent inspections and prevent disks from failing.
To assist O&M engineers in monitoring disk health effectively, SmartX HCI has introduced the disk health check mechanism since the launch of SMTX OS 4.0.10 version. In this article, we will provide detailed information on its features and mechanisms.
Key Takeaways
1. SmartX HCI cluster automatically checks disk health through three methods: open-source tool S.M.A.R.T., SmartX independently-developed tool disk-health, and the data inspection of SmartX HCI clusters.
2. SmartX HCI typically identifies four types of abnormal hard disks: unhealthy disks, sub-healthy disks, disks that failed S.M.A.R.T. checks, and disks with insufficient lifespan.
3. Users can monitor disk health through the Web management interface of CloudTower, which is SmartX’s multiple cluster management platform. While the system automatically isolates unhealthy disks, O&M engineers can identify failure causes using internal commands and message logs.
4. SmartX HCI determines the disk health status according to the system I/O. Therefore, there may be false positives due to HBA card issues, network anomalies, and software factors. In such circumstances, we recommend users contact our engineers for fault localization.
1 Hard Disk Health Check in SmartX HCI Clusters
- The system can proactively and quickly detect and isolate abnormal hard disks.
- Once an abnormal disk is detected, the system will automatically trigger data recovery, send an alert, and show the hard disk status. At the same time, the system will:
- Reduce on-site waiting time and streamline operations for engineers.
- The alert can clearly display the hard disk status and prompt the user to replace the hardware if resources permit.
2 Three Ways to Check Disk Health
2.1 S.M.A.R.T.
S.M.A.R.T. is a widely used disk analysis and detection technology that allows a disk to record multiple attributes while running, including disk model, capacity, temperature, density, sectors, seek time, transfer rate, error rate, etc. When the hard disk is in operation, some of these attributes may change in value. Any of them exceeding the threshold value may indicate the failure of the hard disk. Although the hard disk may still be functioning, it has become unreliable and can fail at any time.
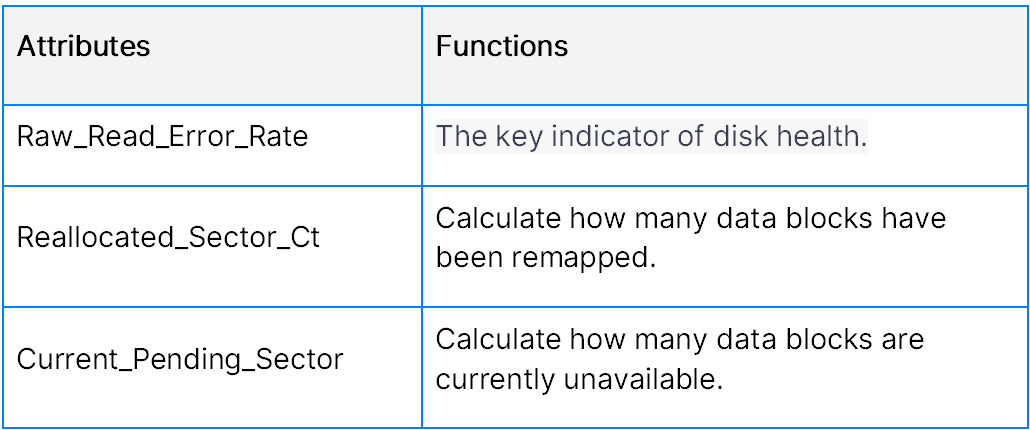
Some attributes are as follows:

Particularly, these attributes are the most important:
In addition, S.M.A.R.T. monitors the remaining lifespan of SSDs and performs checks every 6 hours by default.
2.2 Disk-health
Disk-health is a disk-health check tool independently developed by SmartX. It categorizes abnormal hard disks into four types, including unhealthy disks, sub-healthy disks, disks that failed S.M.A.R.T. checks, and disks with insufficient lifespan.
2.2.1 Unhealthy Disks
SmartX distributed block storage ZBS automatically detects disk health based on the return I/O. It marks the disk as unhealthy in the following scenarios:
- Bad disk: Accumulated I/O errors exceed 100 (both SSD and HDD) or accumulated checksum errors exceed 100 (HDD).
- Slow disk I: An I/O error has occurred with a latency of 30 seconds or more (both SSD and HDD).
2.2.2 Sub-Healthy Disk
The sub-healthy disk refers to a disk that has not been identified as an unhealthy disk while still performing poorly.
- Slow disk II: A disk is identified as Slow Disk II if both HDD and SSD satisfy the following conditions for a continuous period of 6 consecutive 15-second intervals (total 90 seconds):
- HDD
- The average latency is more than 3 seconds.
- IOPS is less than 50.
- The read and write rates are no more than 50MiB/s.
- SSD
- The average latency is more than 500ms.
- IOPS is less than 5000.
- The read and write rates are no more than 150MiB/s.
- HDD
- A disk will be marked as sub-healthy (0 < IO error < 100) if its accumulated read/write errors have not exceeded 100 but with the occurrence of checksum errors (less than 100 times).
2.2.3 Disks That Failed S.M.A.R.T. Checks
This happens if the smartctl tool indicates that the disk has not passed the S.M.A.R.T. checks.
2.2.4 Disks with Insufficient Lifespan
An alert will be sent if the disk does not have a sufficient lifespan, to remind the user of disk replacement.
2.3 Data Inspection
The data inspection function in SmartX HCI clusters actively detects data inconsistencies caused by silent data corruption and triggers data recovery to protect data security.
The mechanism of data inspection involves periodically checking the Generation information of two replicas. Generation refers to the version number of data stored in the block storage, starting at 0. Each time an extent is written, the Generation value is increased by 1. The inspection cycle is 30 seconds, which means the Generation information of the two replicas is checked every 30 seconds to see if they match. If they don’t match, it indicates that the data block with the lower Generation value may have experienced unexpected issues. In such a case, data recovery will be triggered to ensure data consistency.
In addition, the checksum information of replicas is also checked periodically. Checksum information is generated as the data is written to the cluster. It is used for read-data verification. The inspection is conducted on a per-disk basis, with a scanning interval of 5 minutes between two disks. The scanning rate is 5 MB/s, IOPS = 20, minimizing the impact of inspection on cluster performance. As only one disk of one node is inspected at a time, no additional I/O is consumed on the cluster and node.
The above Generation and checksum verifications are independent of each other, ensuring the integrity of the underlying data.
*Data inspection feature is applicable to SMTX OS 4.0.11 and above, SMTX OS 5.0.1 and above, and SMTX ZBS 5.0.0 and above.
3 What to do With Abnormal Disks
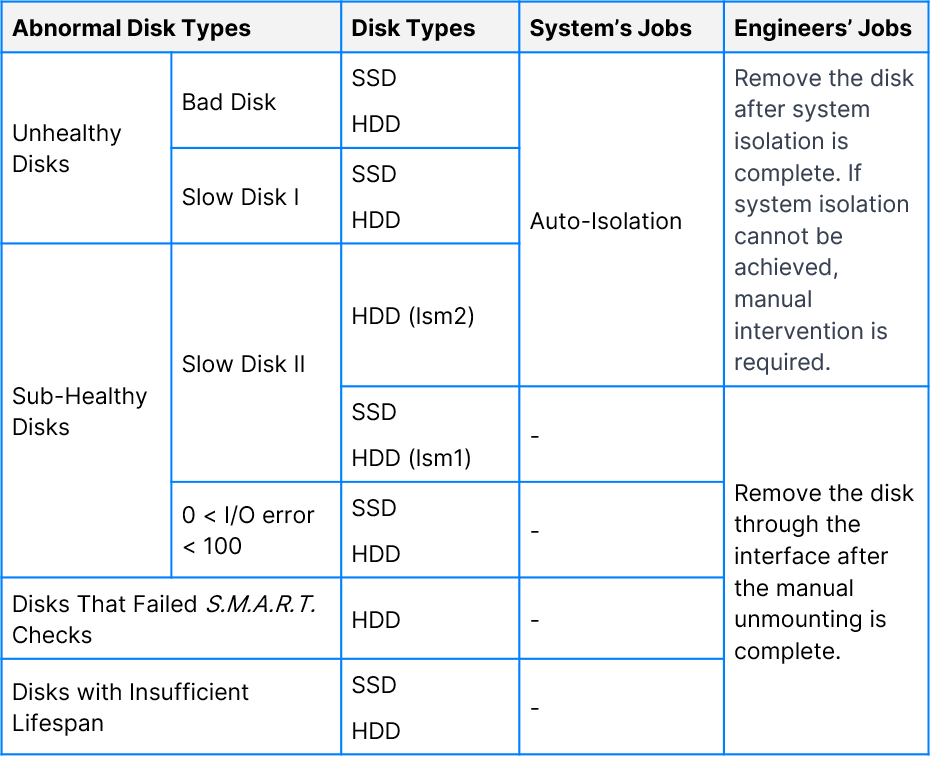
When the system identifies a disk as unhealthy, it automatically isolates the disk and prevents further data writing. All the data will be migrated from the disk. Once the isolation is complete, the disk is automatically removed from the system.
For hard disks that are diagnosed as sub-healthy, failing S.M.A.R.T. checks, or with insufficient lifespan, as they are not completely unusable, the system will send corresponding alerts and allow the user to decide if these disks should be unmounted.
Notably, all the cases above will trigger alerts and inform the user of the abnormal category that the disk falls into.
3.1 Identification and Replacement of Unhealthy Disks
3.1.1 Failure Identification
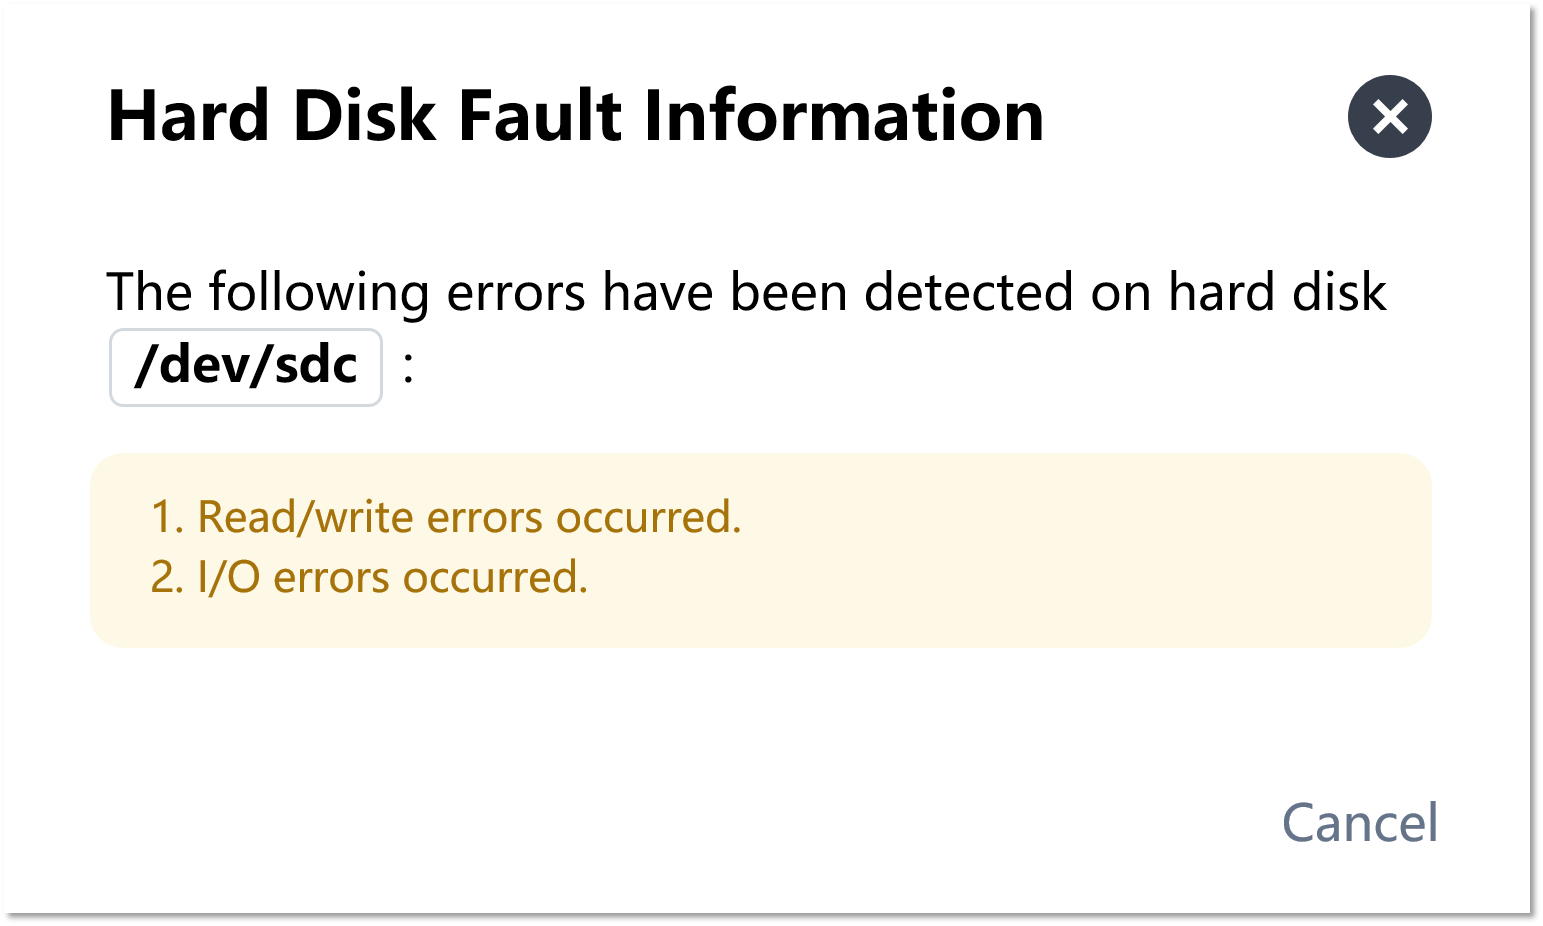
After logging in through the Web management interface (CloudTower), it can be seen that the unhealthy hard disk has been automatically unmounted.

Click “View Fault Information”.
We can identify the failure cause using the disk-health check tool:
- Display the status of sdc on the corresponding node using the following commands.
zbs-node show_disk_status sdc
zbs-node show_disk_status /dev/sdc
- Enter the command below with sdc serial number on any node of the cluster to check the status of sdc.
zbs-node show_disk_status -s PHYS826003JB480BGN
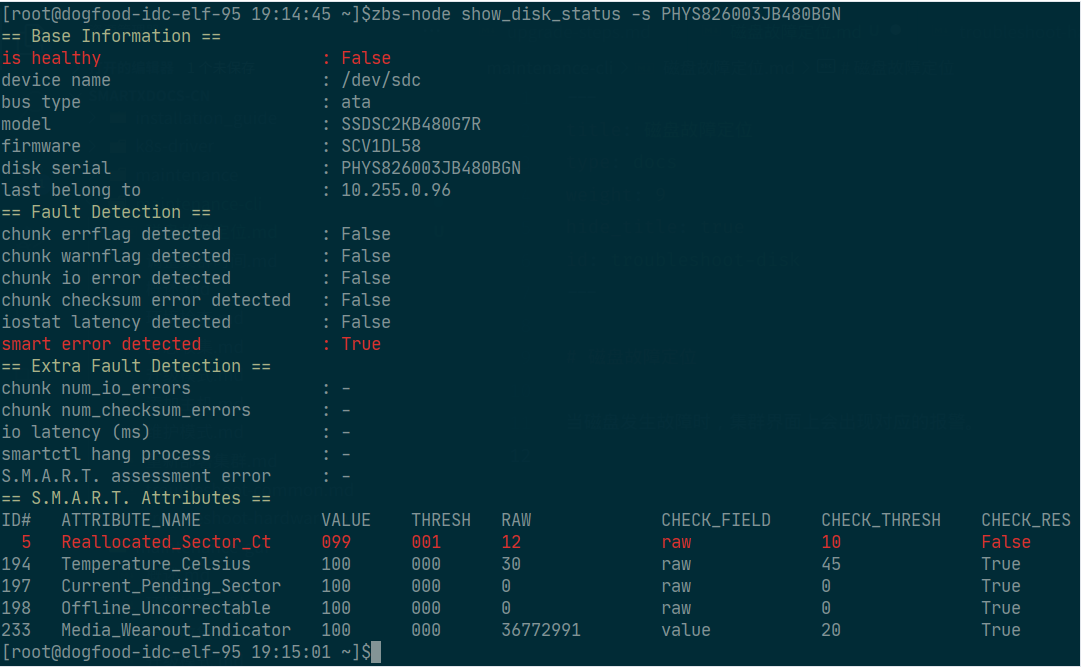
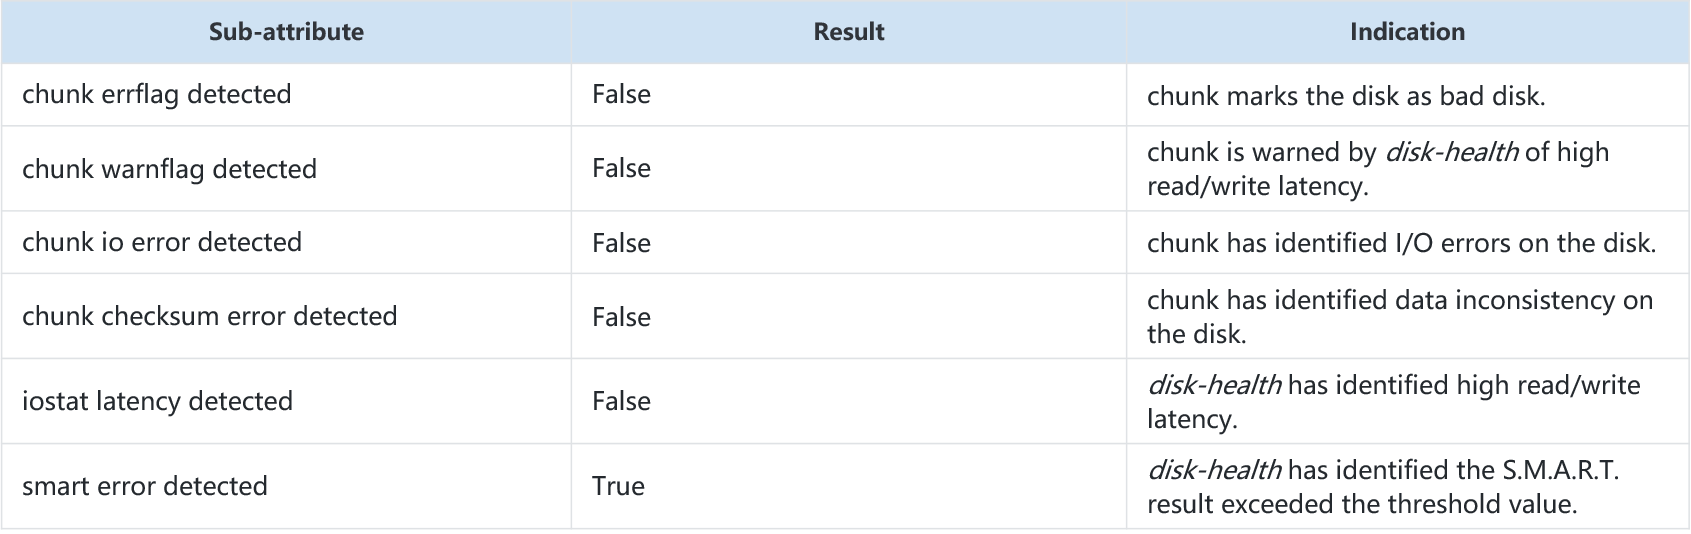
In this example, it can be seen that the S.M.A.R.T. check failed with the indicator showing as “True”. The value of RAW exceeded the default threshold of 10 and reached 12.
The meaning of the outputs are as follows:
Besides, users can check the message log for the failure cause.

3.1.2 Disk Replacement
- Check the server SN and locate it.
- lick “Light on” on the Web interface (CloudTower) and mark the physical location of the disk*.
- Remove the fault disk and replace it with the new one.
- Click to mount the disk after it is identified by Web UI.
- Mounting
- HDD can be mounted as the “data disk”. The mounting time typically takes about 11 seconds.
- SSD can be mounted as the “cache disk with metadata partition” or “cache disk” under the default mode. A software RAID 1 needs rebuilding to mount the “cache disk with metadata partition”, which takes about 10 minutes. Mounting the “cache disk” typically takes around 11 seconds.
* To use this function, make sure the server supports localization using topological information, or the control store is included in SMTX OS Compatibility List.
3.2 Identification and Replacement of Sub-Healthy Disks
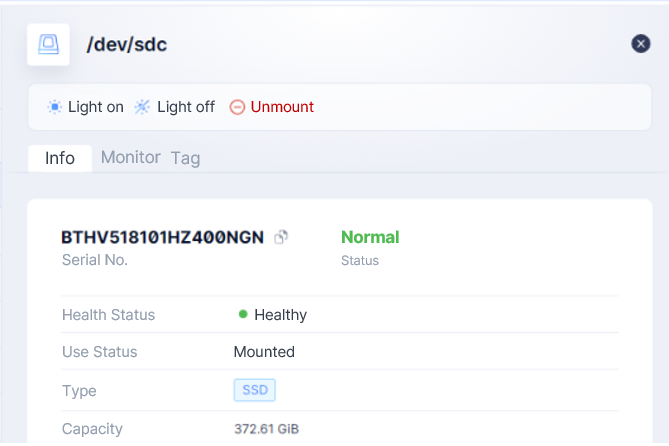
After logging in to the Web management interface (CloudTower), we can find that the hard disk is in a normal “mounted” state. Click “View Fault Information” for specific failure causes.

As the sub-healthy disk simply refers to a disk that does not meet the expected performance, it doesn’t need to be unmounted immediately.
3.2.1 Failure Identification
The process and methods are the same as those of unhealthy disks.
3.2.2 Disk Replacement
- Check server SN.
- Check if there has been data recovery on the cluster. If not, unmount the disk.

- Click “Unmount” on the Web interface (CloudTower).
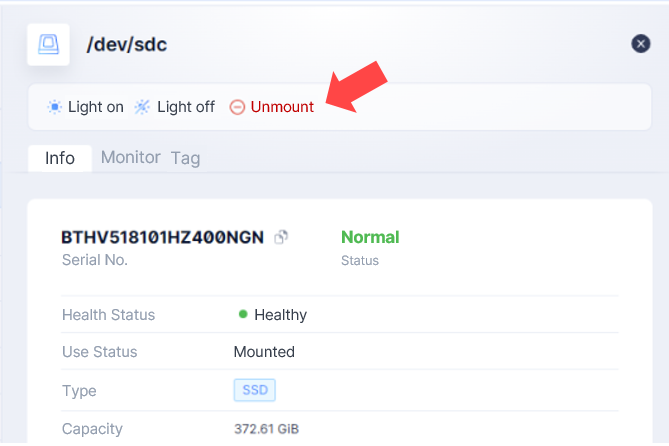
- After the disk is unmounted, its status changes to “unmounted” (the time it takes depends on the data volume on the disk). It is recommended to click on “Unmount” in advance and replace the disk in the server room.
- Click “Light on” on the Web interface (CloudTower) and mark the physical location of the disk.
- Replace the fault disk offline.
- Click “Mount” on the Web interface (CloudTower).
- Mount as
- HDD can be mounted as the “data disk”. The mounting time typically takes about 11 seconds.
- SSD can be mounted as the “cache disk with metadata partition” or “cache disk” under the default mode. A software RAID 1 needs rebuilding to mount the “cache disk with metadata partition”, which takes about 10 minutes. Mounting the “cache disk” typically takes around 11 seconds.
4 Limitations of disk-health
Firstly, disk-health solely relies on system I/O to detect the health of hard disks, so it cannot determine if the failure is caused by the HBA card. If the HBA card malfunctions, both the HBA card and all the hard disks connected to it may be marked as sub-healthy or unhealthy.
If multiple hard disks on a node encounter issues, it is recommended to first contact a SmartX engineer for failure localization. Or contact hardware support for a RAID card check.
Additionally, in SmartX HCI clusters, data is stored in two replicas, with one written locally and the other written to another node. Therefore, an abnormal network may also disrupt the storage link on a node, resulting in corresponding I/O errors. This situation may also require an independent inspection.
Certain software issues can also cause abnormal read/write. Although these issues are not considered disk failures, they will increase the number of I/O errors counted.
In summary, if users receive similar hard disk alerts, it is recommended to use the commands provided beforehand to investigate and identify the issues from the back end.
You may also be interested in:
Reuse Existing Devices with SmartX HCI: 4 Customers Achieve IT Infra Transformation at a Lower Cost
Why Should I&O Team Be Prepared to Take over Kubernetes Deployment and O&M?
Explore Product Features Behind SmartX HCI’s Critical Capabilities